Don’t get spooked by Salesforce Visual Flows – Jenny’s Admin Tip #64
It’s been a while since I last blogged so what better way to come back than to give you a beastly little blog about the wonders of Salesforce Visual Flow. Yes I mentioned the ‘Flow’ word. *Every Admin hides under their desk.* But come on out, they don’t have to be that scary!
Before I continue I’m going to creep it real with you, Flows are tough! So tough it’s been known for Devs to shudder at the thought of creating them – the really complex Flows that is. But not ALL Flows are mind boggling. There are some Flows that are super simple yet enable you to do powerful things for your users.
Now before you run away just take a little peak at the scenario below – I think you’ll find this handy tip un-boo’lievably useful and EASY!
So here is the customer scenario:
When a Quote has been signed automatically create a Contract.
Before I provide the solution, you may be asking why I am using a Flow to create a record? Well one reason is that you might want to launch the Flow on demand, say through a button, rather than have it triggered by a change in a field or someone creating/ editing a record. Also this is going to give you great practise at creating Flows!
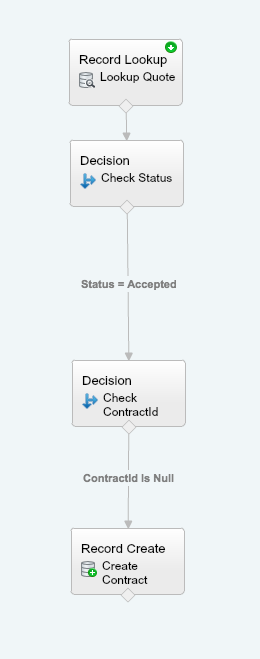
So here is the solution:
Record Lookup
Once you have opened Flow the first thing you’ll want to do is a record lookup on Quote
Drag and drop ‘Record Lookup’ from the Palette, into the Flow builder.
Provide a name for this action – ‘Lookup Quote’
Filter the object you’ll want to lookup. In this case you’ll want to Look up ‘Quote’ that meets the following criteria
Id = your new variable* that you will need to create {!QuoteId}
Scroll down to Assign the records fields to variable to reference them in the flow. ***You can assign the fields that you require, below is just an example….
AccountId to be stored in a {!AccountId} variable (again you will need to create this)
ContractId to be stored in a {!ContractId}variable (again you will need to create this)
Name to be stored in a {!QuoteName} variable (again you will need to create this)
OpportunityId to be stored in a {!OpportunityId} variable (again you will need to create this)
PriceBook (your price book) to be stored in a {PriceBookId}variable (again you will need to create this)
Status to be stored in a {!Status} variable (again you will need to create this)
*”Sc’ariables” allow you to hold data. Think of them as pigeon holes. Each pigeon hole (Variable) belongs to someone (field name) and each one stores information (data) for that person (field).
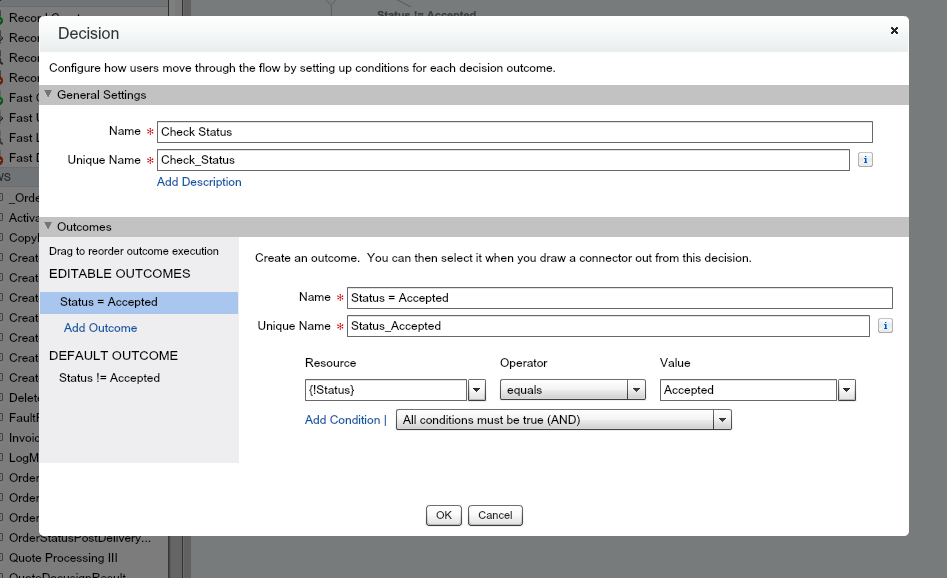
Decision
The next node you’ll need to put into our flow is the Decision. There is where we need to check to see if the Quote status is ‘Accepted’
Drag and drop ‘Decision’ from the Palette into the Flow builder
Provide a name for this action – ‘Check’ Status’
Create an Outcome by-
Providing a name – Status = Accepted
Selecting the value – {!Status} = Accepted.
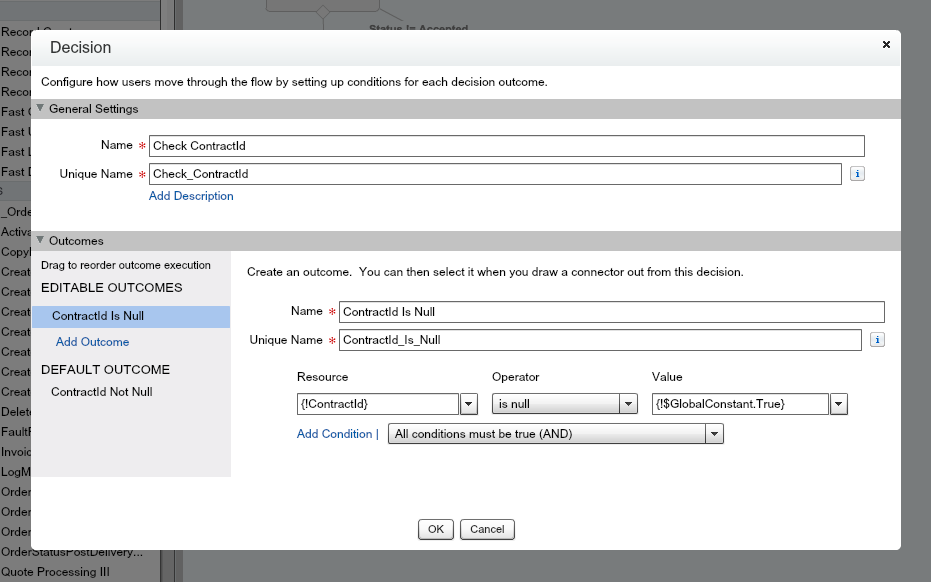
Decision
*If Status = Accepted, let’s add another decision. This time checking to see if a Contract exists.
Drag and drop ‘Decision’ from the Palette into the Visual Flow builder
Provide a name for this action – ‘Check ContractId’
Create an Outcome by-
Providing a name – ContractId is Null
Selecting the value – {!ContractId} is Null {!$GlobalConstant.True}
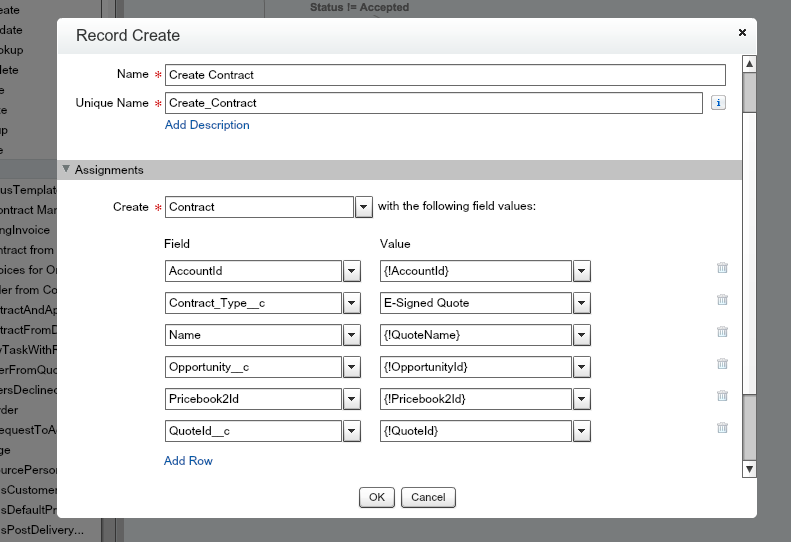
Record Create
*If Contract is Null, (i.e. no contract exists) then you’ll will then need to create the contract.
Drag and drop ‘Record Create’’ from the Palette into the Flow builder
Provide a name for this action – ‘Create Contract’
Choose the record to create – Contact
Assign contract fields with our variables ***You can assign the fields that you require, below is just an example.
AccountId = {!AccountId} variable
Name = {!QuoteName} variable
OpportunityId = {!OpportunityId} variable
PriceBook (your price book) = {PriceBookId}
QuoteId_c = {QuoteId}
You should end up with something that looks like –
There you have it. In just 4 steps you could be on your way to creating records in Visual Flow. See, not so scary right?
Looking for exceptional, professional Salesforce support?
Our independent tech team has been servicing enterprise clients for over 15 years from our HQ in Bristol, UK. Let’s see how we can work together and get the most out of your Salesforce implementation.
Our website uses cookies for analytics, styling, and functional purposes. By accepting cookies, you'll get the best version of our website - and we'll be able to process some of your data to make that happen.
Functional
Always active
The technical storage or access is strictly necessary for the legitimate purpose of enabling the use of a specific service explicitly requested by the subscriber or user, or for the sole purpose of carrying out the transmission of a communication over an electronic communications network.
Preferences
The technical storage or access is necessary for the legitimate purpose of storing preferences that are not requested by the subscriber or user.
Statistics
The technical storage or access that is used exclusively for statistical purposes.The technical storage or access that is used exclusively for anonymous statistical purposes. Without a subpoena, voluntary compliance on the part of your Internet Service Provider, or additional records from a third party, information stored or retrieved for this purpose alone cannot usually be used to identify you.
Marketing
The technical storage or access is required to create user profiles to send advertising, or to track the user on a website or across several websites for similar marketing purposes.
 It’s been a while since I last blogged so what better way to come back than to give you a beastly little blog about the wonders of Salesforce Visual Flow. Yes I mentioned the ‘Flow’ word. *Every Admin hides under their desk.* But come on out, they don’t have to be that scary!
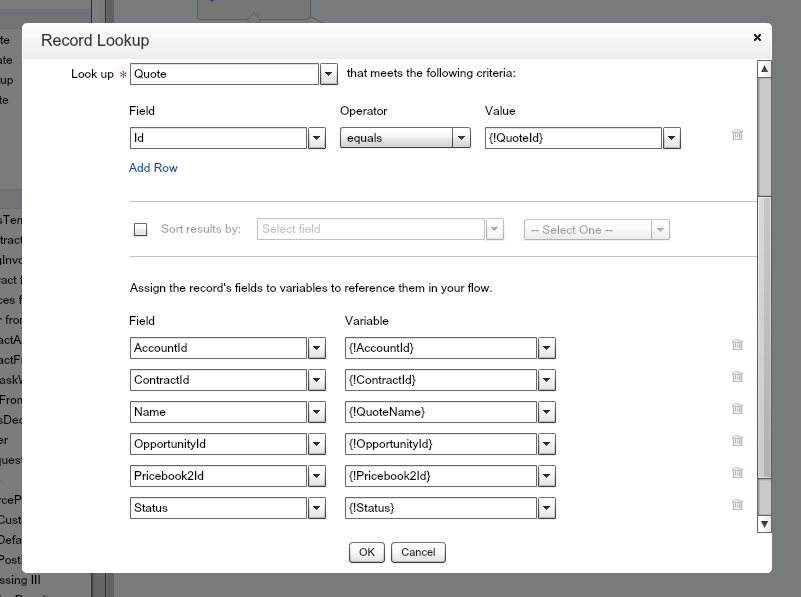
 Record Create